
Following up my last article outlining some basic principles about the new way to build themes for WordPress 6, some facts about the file structure and the almighty theme.json, we continue to rebuild this site.
Before starting again with the theme.json file. As a little recap. In part 1, we looked at:
- Block theme builders/generators
- The Front Site Editor (FSE) in general
- The Theme.JSON file
- Exporting themes
- Dealing with fonts
In this first step, we collect some elements we need to fix, that are not fixed yet:
- Assign Header and Footer to the newly generated front-page template
- Modify the look of the header and the footer
- Modify the look of the articles
- Find a solution for animated items
- Modify the look of the front-page
- Modify the look of other pages
- Find a solution to integrate p5.js
- Find a solution to make the variable fonts behave in a variable way
In this guide I try to cover the first three to four points.
Theme.json and block elements
One of the last elements, we added in the editor in step 1, was modifying the look of an existing block. We modified the “post-date”.
If I look at an article at my test site and my published site, I could see, that quotes also didn’t look the same way.


To modify the look, we open the theme.json in a code editor again (we used visual studio code). Feel free to use my last version of the theme.json.
If you use my JSON file, you will notice, that at the beginning of the file, the schema got added, so my editor gets access to the available terms. If you are not sure, how a module is called, open your editor (and make sure your language settings are English).

To style the quote, I realized for myself, that WordPress 6 still needs a lot of work or maybe at some degree I miss some point.
What we need to do, is adding a border to the left in blue and adjust the spacing and color settings.
"core/quote": {
                "border": {
					"color": "var(--wp--preset--color--primary)",
					"style": "solid",
					"width": "0 0 0 5px"
				},
				"spacing": {
					"padding": {
						"top": "8px",
						"bottom": "8px",
						"left": "32px",
						"right": "32px"
					}
				},
				"typography": {
					"fontWeight": "300",
					"lineHeight": "var(--wp--custom--typography--line-height--medium)",
					"fontSize": "var(--wp--preset--font-size--large)"
				}
 }
Additionally, I checked the editor if there wasn’t any applied style on the element. In my case a bold from the editor got me some extra work because I thought my styles won’t be working.
The result looks partly ok… but only partly. There’s a mysterious spacing at the top of the quote and the cite also got larger:

The Spacing is mysterious, as when I remove the 8px, the whole text is at the top edge again; even without a more than 20-year eye, trained in pixels, anyone sees that the top padding is far larger. Another strange thing about JSON is the “elements” handler.
My guessing would be, ok, the whole blockquote was transformed with the font-size. Maybe I could adjust one element only, in this case the cite element.
Being in the editor, in the JSON file, I am allowed to use “elements”, but only headlines are allowed (so h1 to h6) and links; honestly, I don’t see the point, why not allow all elements?
If I would be able to use cite, something like this would be possible:
"core/quote": {
                "border": {
					"color": "var(--wp--preset--color--primary)",
					"style": "solid",
					"width": "0 0 0 5px"
				},
				"spacing": {
					"padding": {
						"top": "8px",
						"bottom": "8px",
						"left": "32px",
						"right": "32px"
					}
				},
				"typography": {
					"fontWeight": "300",
					"lineHeight": "var(--wp--custom--typography--line-height--medium)",
					"fontSize": "var(--wp--preset--font-size--large)"
				},
				"elements": {
					"cite": {
						"typography": {
							"fontSize": "var(--wp--preset--font-size--medium)"
						}
					}
				}
      }
Unfortunately, it’s not. For now, I keep it as an unresolved matter.
Font-variation-settings
Digging for one solution might bring new ideas for another thing.
In my case, there’s no workaround outside the styles file, so far. Same applies for font-variation-settings. Looking in the living reference, it is not possible to assign other font properties than the ones, being mentioned here:

Being a bit disappointed about those two facts (and seeing many rebuilding stuff coming, when I do it via a workaround and those things will be integrated later), I continue with my list from the top.
Assigning a header and footer to a new created template/page type
To assign a header or a footer to our newly generate front-page theme, we have two options. One is using the editor; the other is using our code editor.
Using an editor, we basically open two files from the templates folder. The first, is the front-page.html file, we copied in our first session to the folder. The second file is another template, we already know is available with a header. Son in this case I open a single.html file.
The next step is simple copying. This one sounds like a header, so we copy it to our file.
<!-- wp:template-part {"slug":"header","tagName":"header"} /-->And at the end of the file, there’s also a footer we are able to copy.
<!-- wp:template-part {"slug":"footer","tagName":"footer"} /-->This is fairly easy!
The alternative is going for the editor. In the editor we edit the site and select our front-page. Clicking the first element on an activated list view, we select, insert before and in the generated paragraph we start typing “/” and write and select header.

We are either able to create a new header or to assign a header that is available. This is a neat feature I needed for my kindergarten site and a login area before.
The same is possible with the footer. In my case I always selected the ones that were available.

To finish this step, I would export the template again (click the three dots at the top right and you will find the dialogue) and copy from the templates folder, the newly created front-end template to my themes folder.
Why would I do it that way?
Open all templates. If you opened the view, you see a little note at the template that is has been modified.

With the three dots to the right, you could reset the template. Attention, you will get the version, that is in your folder.
So, for every now and then, I recommend putting the adjusted templates to the folder to have them ready as a backup.
Modify the header
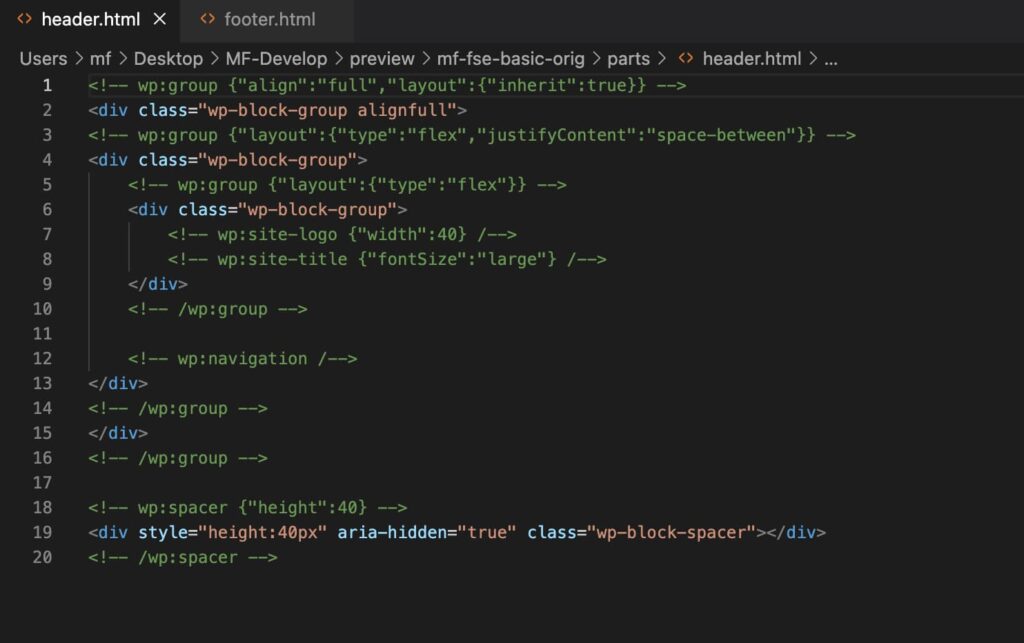
To modify the header and the footer, we quickly look at the overall file structure. The one way is the classical way via the code editor. In the folder parts, you will find the footer.html and the header.html. Opening it, at least for me, they don’t look very familiar:

The written code, you see here, is also available to copy via the pages I shared in my first part in the end. So, from the MOBA (Museum of Block Art), you could for example copy the code of a block and add it in the code. Something, you might play around. Here’s an example to check out the code: Abstractions Study No.8.
As you might guess already, those blocks are built in the editor, but as shown with the front-page template before, you could create something in the editor, export it and then have it ready in the file folder (and as code).
We also start going for the editor. In the editor go to the template parts and start editing the header.

My starting point (opening all the nested list elements on the left): What you will typically do, is uploading your site logo. If the upload button is not available in the space, click on replace to select your file.


In my case, my site logo is an animated SVG. Something WordPress can’t handle here to be used as site logo (as of end of May 2022). So please select a picture first, in best case a png file (we could change special things like this later in the code). For now, I chose a png, static version and adjusted the proportions and behavior on the right. Feel free to also adjust to your preference. This logo will also be used as favicon later.

The next one is the site title. Obviously, it is formatted in a different font. As you might remember, we could also style core elements in our JSON file (which I would recommend), trying to style it with the editor, won’t work in this case, see picture on the right. So, we switch to the code editor and apply basic settings there.
In the blocks section, add the new element site-title and your desired attributes. In my case I adjusted some spacings, transformed the text and had to remove the underline of my link. Therefore, we have a nested statement, with an element inside a core attribute.
"core/site-title": {
				"spacing": {
					"padding": {
						"left": "6px",
						"bottom": "4px"
					}
				},
				"typography": {
					"textTransform": "lowercase"
				},
				"elements": {
					"link": {
						"typography": {
							"textDecoration": "none"
						}
					}
				}
			},
Unfortunately, I encountered some WordPress bug doing so. After reloading my editor, it almost looked good, as I aligned the rows to bottom. The preview ignored it (also in other browser, so it wasn’t a caching issue).


The property to align the flex items to the end is not applying currently. For now, I leave it like this and only add the same distance to the bottom for the element of the navigation and some spacing to the links. From my understanding, I would do something like this. Unfortunately, again there are different behaviors in the editor and the preview.
"core/navigation": {
				"spacing": {
					"padding": {
						"bottom": "4px"
					}
				},
				"elements": {
					"link": {
						"spacing": {
							"padding": {
								"left": "10px",
								"right": "10px"
							}
						}
					}
				}
			},
The editor shows a behavior, that is ok. Using the preview and the inspector, we notice (apart from the mentioned flex issues from before), that the spacing of the links is not applied. By the way, it is quite strange to get used to the wordings. So, no matter, if I tried the code from before, or nesting the link of the navigation as link element, similar, to this:
"core/navigation": {
				"spacing": {
					"padding": {
						"bottom": "4px"
					}
				},
				"elements": {
					"link": {
						"spacing": {
							"padding": {
								"left": "10px",
								"right": "10px"
							}
						}
					}
				}
			},
For both ways the rendered site ignored my styles… and in the inspector you could see that those styles were overwritten in the code, by a styles.css. OMG the classical style sheet, finally 🙂 unfortunately not, as you won’t find this style in the existing theme folder. Our styles.css is still empty… another item for our backlog to get handled.
One last thing to get fixed is the spacing of the header. We need more spacing to the top. As the handling of CSS in JSON and the application often kind of suck, we do it in the editor we a spacer.
In my current header from the template, there’s already a spacer to the bottom. One nice thing of the editor is you could drag elements in the list view to another position. Or in my case, I want some spacing of 12px to the top and the bottom (I would absolutely prefer to do it via code, but in terms of simplicity, just do it that way). First, modify the spacer to 12px and then duplicate it and drag it to the top. At least in the editor, it looks good… so now, we test one thing… the export and placement in the folder to hopefully get some better effect at the frontend.
Spacing in the header via the editor
Now we export the template again. Remember in the right column under the three dots, there’s an option to export templates.
Being exported, we get a code that looks quite promising in terms of the alignment, as we obviously see in the code “verticalAlignment”: bottom… keeping fingers crossed and replacing the file to finally get our desired effect.

Unfortunately, the effect is still not being applied in the frontend. There’s some mystery going on as of end of May 2022…
So, before you are frustrated, a little example as there’s always a way to work around and get the effect one is aiming for. Regarding styles that get overwritten, it is likely, we could solve it the classical WordPress way, such as by using wp_dequeue_style( string $handle ). Therefore, we need to work in PHP or do it another way, overwrite in styles.css.
Another example, on how to modify is integrating my animated SVG Logo in the header. Honestly, I didn’t figure out yet the official WordPress way on how to do it, but I know a working solution.
Therefore, open your header.html in the folder and look for the element site-logo… after the declaration, we could put in another element, such as my logo. If you want to play with SVG Logos, look at svgator.
Integrating the code in the source code, gives me direct output in the frontend:
Unfortunately, I didn’t find a proper way to nest it, to “overwrite” the normal site-logo. Maybe it’s not intended to happen. In this case I recommend getting rid of the site logo and adding the code manually. And search for an appropriate solution in some month. Currently the search results are too bad if you have specific issues around WordPress 6.
Modify the footer
Our next mission looks more promising. The footer:

Looking at a design frame, one could thing, let’s do it via CSS grid…; that’s a normal thinking if you switch your mindset thinking like a developer. Getting started with WordPress 6, I try to see it with the block perspective first and build it via blocks. Maybe the best way to get started with WordPress 6.
So, what you might see are columns. One way would be 50% and 50% with the second column having a nested column with 3 columns. Let’s try this:

While editing, you might think, how to build the link list. So, in my example, I first quickly did a list and then thought, ok, better do a navigation.
Menus or navigation in WordPress 6 kind of suck at the moment. To create a navigation, type in navigation. Then you are asked to select an existing menu or create a new one. In my case, as I have different menus at the top and at the bottom, I chose “start empty”. Unfortunately, you won’t find Menus in the backend dialogue under Appearance anymore. In fact, there no dedicated spot as of May 2022. I am sure, that will change, as it is very inconvenient like it is.
After you filled your first menu item, just click enter and you will be guided to the next item. Always type the name of the page and select the page.
If you need custom links (in my case I need custom links for twitter, github, codepen), just type in the link title, without selecting an element. Afterwards edit the element and add the desired link.

My first results, building it that way was quite good:

I am missing my last line and some formatting could be improved. On my original example I used a two-column layout for the list. As the navigation gets translated as a list, I will apply this effect here, too. The way that will absolutely work, will be CSS and in this case, I will only try the CSS way, directly.
Finally… honestly, a CSS file feels like home, after working in the JSON file and trying to get hold of the new structure (and all the tiny little bugs). So, here’s my empty one:
I added a menu name and further down, additional CSS classes:

And I ran into trouble… as the styles weren’t applied yet.
In my starter theme, the styles weren’t assigned – in the WordPress language, enqueued.
Adding a functions.php to get the style.css going
Till now, I didn’t even realize, that block themes could run without a functions.php. Speaking of a simple site, this is great. As I hoped, I could do the whole tutorial here without any PHP, it sucks.
So, we create a simple PHP file to get the style.css working. Therefore, please open your editor and create a new file called functions.php and add the following lines:
<?php
/**
 * Functions and definitions
 *
 * @link https://developer.wordpress.org/themes/basics/theme-functions/
 *
 * @package mf-fse-basic-orig
 * @since 1.0.0
 */

wp_enqueue_style( 'style', get_template_directory_uri() . '/style.css',false,'1.0','screen');
In the file you will find the most important link to get to know about the functions.php and I also only copied the existing example from here and slightly modified it for me.
Afterwards add the file to your project folder/upload it to your root folder:

Et voilà, some styles are working now – As I was wondering, while typing in the styles file and nothing happened, I added a simple red color for all navigation links to check if it was working at all, till I realized, there’s no functions.php to enable my style.css.
I would absolutely recommend to do the same… use a style with an obvious effect (and !important) at the end to see if anything is working or there might be a bug elsewhere.

Footer Styling – Styling in style.css
In my case, I wanted the navigation list in the footer to appear in two columns. And I also wanted to change the link behavior of all links (also for the header). For my purpose, I used the following style for now (this is my whole style.css as all other definitions come from the JSON file or native styles):
/*
Theme Name: mf-fse-basic-orig
Author: Manfred Feiger
Author URI: https://manfred-feiger.com/
Theme URI: https://manfred-feiger.com/
Tags: full-site-editing
Text Domain: mf-fse-basic-orig
Requires at least: 5.8
Requires PHP: 7.4
Tested up to: 6.0
Version: 1.0.0

License: GNU General Public License v2 or later
License URI: http://www.gnu.org/licenses/gpl-2.0.html

All files, unless otherwise stated, are released under the GNU General Public
License version 2.0 (http://www.gnu.org/licenses/gpl-2.0.html)

This theme, like WordPress, is licensed under the GPL.
Use it to make something cool, have fun, and share what you've learned
with others.
*/

.mf-columns ul {
    width: 100%;
    columns: 2;
    column-width: auto;
    column-count: 2;

}
.mf-columns .wp-block-navigation__container {
    display: block;
}
.mf-columns ul li a.wp-block-navigation-item__content {
    padding-bottom: 8px;
}
.wp-block-navigation a:hover {
    text-decoration: underline;
}
This is the results of the applied styles:

For the time being I am happy and as always, I recommend exporting the theme again and copy the newly generated footer to the appropriate folder.
Step by step, we are getting closer to a theme. But again, the tiny details are the true pains we are facing. Working with styles still feels more comfortable.
To get my current file, feel free to download it here.
Here are some recommended sources to keep you going:
- Full Site Editing for theme developers
- WordPress courses site
- Block Editor handbook
- Theme handbook
- Overview of what's new to WordPress 6
If you are one of the block editor haters, explore some magic that could be generated with the editor:
This Article was mentioned on manfred-feiger.com